Bronze Casting -
Step 2
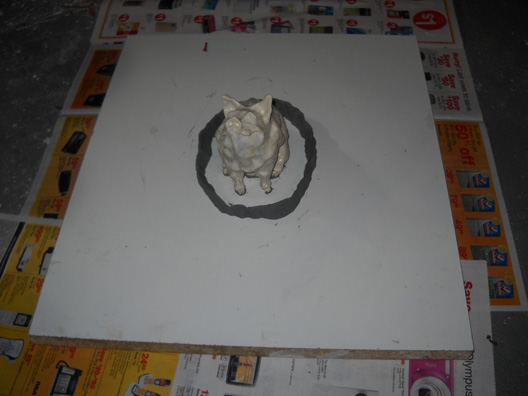
Making the Mold - Securing the Model
Since most bronze sculpture - but not all - is made from the lost wax process, a clay model won't do you much good. So somehow you need to go from the clay sculpture to a wax copy. Now wax sculpture can be created directly. That is you can simply take some wax and make a sculpture. Wax modeling can be additive - you add bits of wax together to get what you want - or it can be subractive - that is, take a block of wax and carve bits away until it looks like what you wanted to carve. So some bronze is cast from models sculpted directly from wax. But that is not the usual modus.
Instead most bronze statues - certainly the large ones you see around the cities and towns - are made from wax casts. To make a cast, of course, you need a model like the one from the previous page. We reiterate. The major advantage to making a wax cast rather than a direct wax sculpture is it is much easier to make the statue hollow (necessary for large works). Furthermore, you can make a number of identical wax copies from one mold.
In them thar olden days, wax casts were made from plaster piece molds. That is molds that fit together in many parts so you could pour in the wax and easily disassemble the mold to avoid undercuts - that is, parts of the statue which protrude in inconvenient manners and would lock the mold in place. With that unfortunate occurrence the only recourse would be to destroy the model or destroy the mold.
Today the number of pieces of a mold can be dramatically reduced by first making a rubber inner mold surrounded by a plaster shell or the mother mold. The rubber helps preserve the fine details, and its flexibility means you can remove it from the model much easier. For instance, the model used here would have been used to craft a plaster piece mold of a minimum of six parts and more likely ten. But as we shall see, the corresponding rubber mold only needed two pieces. The plaster mother mold also was made in two parts.
The first step, though, it to secure the model onto a surface so you can add the first layer of rubber. This picture shows the clay model held to a flat board by oil based clay. A bit of clay was stuck on the underside and stuck onto the board. Then bits of clay were smushed around the sides to prevent the rubber mix - added as a liquid - from oozing underneath. Sometimes wax is used instead of clay to attach the model to the surface, particularly if you need a bit firmer attachment. Finally not only the model but also the surrounding surface is coated with shellac to make the (eventual removal) of the mold easier. In this case, though, the model had already been shellaced and the surface simply sprayed with a silicon mold release. That worked fine.
Also you can, as we show, make a clay "dam" surrounding the model to contain the liquid rubber. This is (obviously) to keep the liquid from spreading out too much. But as on the next page we'll comment further on the usefulness or lack thereof of this device.
More complex structures require more elaborate molding strategies - undercuts and negative spaces can be a problem even with rubber - but using a rubber mold is far simpler than using a nineteenth century style plaster piece mold.
The next step is to add first layer of the rubber.